Casual hairstyles for medium hair, light, with bangs. How to make it quickly with your own hands. Photo. Original everyday hairstyles: how to quickly and easily make hairstyles for every day Everyday hairstyle
Scythe
If you think that a classic braid is too banal for a summer walk, we offer several fairly simple but stylish options that will be an excellent alternative to a traditional hairstyle.Option 1
To begin, make a parting on one side and start braiding from the opposite temple. Move diagonally, weaving strands from the crown and forehead area. As a result, you will get a stylish asymmetrical and not at all hot summer hairstyle.Option 2
This is a very simple and quick technique that will help you slightly improve the classic braid. First of all, tie a not too tight ponytail with a thin, invisible elastic band. Make a gap in your hair above the elastic and thread your ponytail through it. Then, braid your hair using any technique you like. Thus, a simple everyday hairstyle is ready.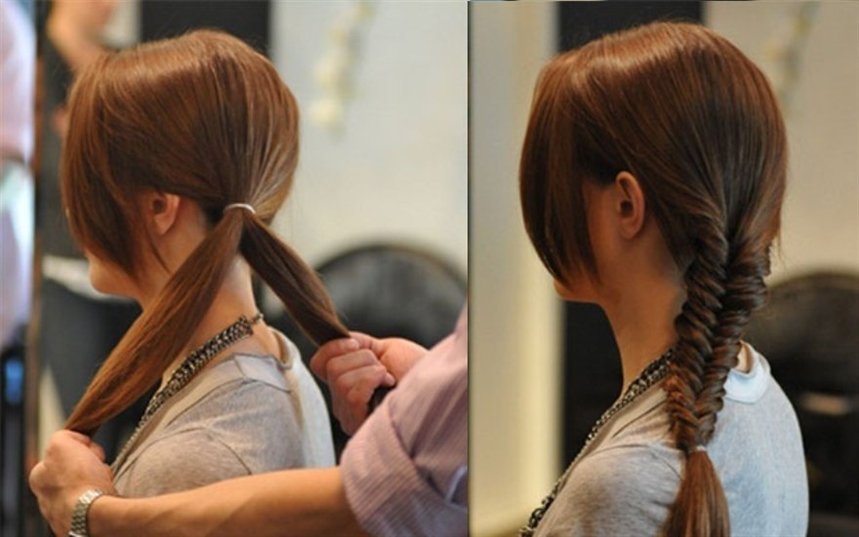
Option 3
This hairstyle looks great on long hair. To begin, tie a ponytail that is not too tight at the side. Make a gap above the elastic and let all the hair through it. To add volume, loosen a few strands. A little lower, tie another elastic band and repeat all the steps again. The number of sections depends on
Option 4
To get such a careless but stylish braid, you need to curl your hair in light waves and backcomb it on the top of your head. Then braid your hair using any technique you know. When the braid is ready, pull it in different directions to add volume. At the end, divide the hair into two parts, tie it in a knot and secure it with a bobby pin on the inside.
Option 5
Separate one side strand at each temple (above eyebrow level). Braid them into a braid. Grab a curl next to each braid and secure it to the back of your head with an elastic band or hairpin.Repeat the steps, separating the strands near the ears. Braid them into braids, grab adjacent curls and secure them at the back of your head. The rest of your hair can be left loose or braided.

Option 6
Comb your hair with a side parting. Separate the strand near the ear and braid the hair using any technique. Don't braid too tightly. Secure the end of the braid with a clear elastic band. Release the strands from the braid to give them volume. The final touch: spray your hair with hairspray. This option will look best on curly hair. If you have straight hair, spend a couple of minutes curling it with a curling iron.
Option 7
Make a side parting. Separate a section of hair from the parting and begin braiding, taking in the hair that frames your face. Use any technique. Having reached the neck, change the braiding technique and weave the remaining hair into the main braid. When finished braiding, place an elastic band on the end of the braid. Release the strands, which will make your hair look fuller. Finally, spray your hair with hairspray.In the photo below you can see the combination of a simple braid and a fishtail. It looks very impressive.

Option 8
A quick and simple hairstyle option that even a first-grader can handle. Despite all the ease of weaving, the final result is a styling that others will consider unusually complex.So, divide your hair into three equal parts. We braid one braid from each part, the ends of which are secured with small elastic bands. Now take one braid and roll it into a ball. We secure it with hairpins at the base of the back of the head. We make balls from the remaining braids.
This hairstyle has only one drawback: true Rapunzels will have to tinker with braiding their curls. But those with medium-length hair can handle braiding in a matter of minutes.

Option 9
An inverted braid seems unusually complicated, but in reality everything is very simple. The braiding technique is surprisingly simple and with its help you will create a unique hairstyle in a couple of minutes.First level: separate one strand above your forehead and make a ponytail. To prevent the ends of your hair from interfering with your work, curl your ponytail onto the top of your head and secure it with a clip.
Second level: grabbing the side curls, we make a second tail. At the same time, we retreat a little from the first tail. Now remove the clip. We divide the first tail into two halves, between which we draw the second tail. We bring the tip of the second tail up and secure it with a clip. Leave the ends of the first tail at the bottom.
Third level: grab a strand a little lower, connect it to the free ends (from the first tail). Making the third tail. We remove the clip, divide the ends of the second tail into two halves and pass the third tail between them. We attach the third tail with a clip at the back of the head. Leave the ends of the second tail below.
We repeat the steps as necessary. Once you've finished braiding, secure the end with an elastic band. The final touch: carefully release the strands, starting with the very first ones. The higher the strand, the more volume we give it. It is not necessary to braid your hair all the way – the hairstyle will look chic even with three levels.

If you are looking for a simple but original summer hairstyle, an unusual ponytail will be an excellent option both for everyday life and for an evening walk.
Option 1
To create this hairstyle, first curl your hair a little at the ends. Tie the ponytail with a thin elastic band. Make a gap in your hair and thread your ponytail through it. If necessary, curl your hair a little more or separate the curls with your fingers to add volume.
Option 2
For this hairstyle, the hair must be straight, so if necessary, use a straightening iron. Then, divide your hair into two layers: top and bottom. Gather the top layer of hair with a thin elastic band at the back of the head on either side of the head. From the bottom layer, weave a braid in the opposite part. The thickness of the braid depends on your personal wishes. Wrap the braid around the elastic band of the ponytail and secure the end with a small hairpin.
Option 3
To create a more elegant ponytail, you will need hair foam or wax. Make an even parting (in the center or side, whichever suits you best) and gather your hair on one side. Apply foam to them and divide into two equal strands. And then just tie a knot twice in a row. Secure with a thin invisible elastic band directly under the knot, and twist the ends of the hair a little or lightly backcomb it.
Option 4
To create such a stylish ponytail that is perfect for any kind of summer event, you will need a curling iron or straightener, hairspray, bobby pins and a little time. To start, curl your hair at the ends. Then divide them into 4 parts: at the back of the head, at the crown and on both sides at the temple, and tie them with elastic bands so that they do not mix with each other. Take the hair from the top of your head and comb it a little from the inside, and then twist it with a flagellum and secure it with bobby pins. Repeat the same with the hair at the temples. When the hairstyle is ready, spray it with hairspray to be secure.
Option 5
A very romantic summer hairstyle. To do it, divide your hair into two parts along the parting line. Braid braids on both sides, which converge from the temples at the back of the head. Tie them together with a thin elastic band. Then separate a thin strand from the ponytail and braid it. Wrap it around the elastic band and secure it with a bobby pin on the inside. Comb the tail a little with a comb or curl it with a curling iron.
Option 6
The ponytail is one of the most popular and versatile hair trends in the world. This option is very fast and original. To begin, curl your hair at the ends and then divide it into two parts. From the hair at the top of your head, begin to weave a loose braid, weaving all the strands into it along the line of your forehead to open up your face. The braid should end at the back of your head, and then lift the rest of your hair and tie it together using a thin elastic band. To hide the elastic, you can wrap it with a strand of hair and secure it with a bobby pin on the inside.
Option 7
Another easy and quick way to make an elegant ponytail. Curl your hair at the ends to create light waves. Then divide them into two parts. Comb the hair on the top of your head a little and tie it high with a thin elastic band. Gather the rest of your hair a little lower and also tie it with an elastic band. To create more volume at the top of your hair, loosen a few strands at the top of your head.
Option 8
This is a great way to turn an ordinary ponytail into an original hairstyle in a few minutes. Tie all your hair into a ponytail at the back of your head. Separate a small strand and wrap it around an elastic band to hide it, and secure with a bobby pin on the inside. Then tie another elastic band just below. Make a gap in the resulting sections and pass the hair through it. Tie another elastic band a little lower and repeat the procedure. The number of sections directly depends on the length of your hair. To make the ends look natural, curl them a little with a curling iron or flat iron.
Option 9
Divide your hair into 3 strands (central and two side). Secure each strand with an elastic band if you are doing your hair yourself. This way your hair won't get tangled. Roll the central strand into a rope and wrap it around the side ponytail on the right. Separate one curl from the left strand. Roll it into a rope and wrap it around the right tail. We also roll the remains of the left strand into a bundle and wrap it around the tail. We secure the hair with an elastic band.This hairstyle has several advantages. Firstly, we don’t need to maintain clear symmetry (uneven strands give a chaotic shine). Secondly, the absence of a parting allows you to disguise some defects: unpainted roots, dandruff or too thin hair.

Hairband made of… hair
This is the simplest and most original way to replace a regular headband and remove hair from your face on a hot day.Option 1
First, divide your hair into two sections. Gather the hair at the back of your head with an elastic band to keep it out of the way, and proceed to the strands at the front of your face. Make a parting on either side and begin to weave a braid, weaving strands into it along the line of the forehead. When the “headband” is ready, loosen the hair at the back of your head and enjoy the original hairstyle.Option 2
Separate a small section of hair from the neck area and weave it into a thin braid. Wrap it around your head and secure it with a bobby pin on the opposite side. This hairstyle looks great on curly hair.
Option 3
Make an even parting and separate two strands from both sides of your head. Weave them into braids, not too tight, and tie them at the ends with invisible elastic bands. Connect them together at the back of the head and secure them with bobby pins.
Option 4
Separating the strand in the bang area, we backcomb it. Near the ear on the right, we separate one curl and form a flagellum, twisting the hair away from itself. Secure the tip with a clear elastic band. Take the bobby pin and secure the tourniquet at the back of your head, closer to the left side.We repeat the steps on the opposite side: separate the strand near the ear; we form a flagellum; secure the tip with an elastic band. We place the second flagellum under the first and secure it with an invisible one.

Hairstyle in 30 seconds
If you’re running out of time and you’re in a hurry to attend an event where you need to be dressed up, these options are for you!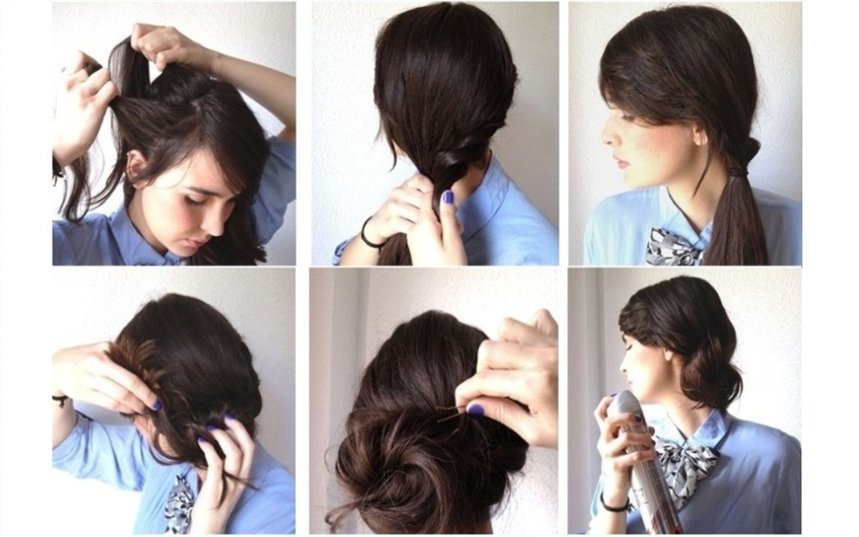
Option 4
Divide your hair into three sections. The middle one should be larger than the others. Weave a voluminous braid out of it and twist it into a knot using bobby pins or bobby pins. Roll the strand on the left into a bundle and pass it around the knot counterclockwise (from below). Wrap the strand that remains on the right around the hairstyle clockwise (through the top). Secure with bobby pins or spray with varnish.
Option 5
To achieve this hairstyle, you need hairspray, bobby pins and a little time to practice. To begin, fluff your hair with your hands to create good volume and apply generous amounts of hairspray. Then gather your hair together and curl it inward to form a shell. Secure your hair with bobby pins. You can leave a few loose strands to give your hair a sophisticated casual look.
Option 6
This is a very simple way to make a knot at the back of your head. First, tie the ponytail and divide it into two equal strands. Twist each strand clockwise. Then start weaving the strands together (counterclockwise). Tie the tourniquet at the end with an elastic band and twist it into a knot at the back of your head, securing it with hairpins.
Option 7
Tie a ponytail at the back of your head, not too high. Make a gap above the elastic and pull the hair through it. Then, carefully curl the tail into a shell and secure with a hairpin or other accessory.
Option 8
To make a hair bow, you will need a thin elastic band, bobby pins and 1 minute of time. To begin, tie a knot high on the top of your head and divide it into two parts. Pass the tip of the tail in the middle and secure it at the back with a bobby pin. This hairstyle is also called “Lady Gaga style bow”.
Option 9
This hairstyle will take longer to create than the previous ones. You will need a foam donut and pins. Tie a high ponytail, put a donut on it and hide your hair under it one strand at a time, securing it with hairpins for security. At the end, the hairstyle can be decorated with a bow or other accessories.
Option 10
Curly “donuts” look much more interesting than ordinary round ones, if you like ballerina buns. Such “donuts” can be bought in specialized stores or ordered online. The technique is no different from the classic versions. The hair must be tucked behind the donut.
Option 11
Pull your hair into a ponytail high on the crown of your head. Divide the tail into two halves, wrapping each with a flagellum. Now roll the ropes around the elastic band. We twist them tightly and in opposite directions (left - to the right, right - to the left). Secure your hair with bobby pins and fix it with hairspray.
Option 12
Divide your hair into two halves. Take the first strand and separate a curl from your forehead. We twist the curl away from ourselves, starting at the forehead and ending behind the ear. We tie the first ponytail low at the back of the head. We do the same with the second half of the hair. Now all that’s left is to roll the bagels. Ready!
Perhaps the easiest way to escape the heat in the summer and at the same time create an exquisite hairstyle is a Greek headband.
Option 1
Place a Greek headband on the top of your head and thread small sections of hair under the elastic. You will have a beautiful hairstyle in just a few minutes.
Option 2
This is a more complex example of how to use a Greek headband. For this hairstyle you will need two headbands. Place one under your hair and then backcomb the back of your head. The second one - put it on the top of your head and wrap the strands under it. Voila!
"Malvinka"
One of the fastest and cutest hairstyles is familiar to us from an early age, thanks to Malvina, a girl with blue hair. The main difference between this hairstyle: the hair is loose, the upper strands are pinned high on the back of the head.Option 1
A great way to add variety to your look if your hair barely touches your shoulders.Separate the strand above the bangs and backcomb it. Place a roller under the strand and secure it. You can use Velcro curlers as a roller. They stay on the hair better. We grab the side curls and (together with the combed strand) secure them to the back of the head with an elastic band. Using any thin object, we pull the hair out a little from above, giving it volume. A Chinese stick or an ordinary hairpin will do. It is better to pull out strands with your fingers on long hair, but not on short hair.

Option 2
Separate one strand at each temple (above the ear) and secure them at the back of the head with an elastic band. We grab the curl with the first strand, pass it over the ponytail and wrap it behind the first strand. We repeat on the opposite side: grab a curl, pass it over the ponytail and place it under the strand. We connect the ends of all four curls with an elastic band. It turns out to be a cute heart.
Option 3
Using a hair straightener, curl the ends on a few side strands. Separate one strand at the top of your head and backcomb it with a comb. To keep the strand in place, spray it with hairspray. Having laid the combed strand, pin your hair with a hairpin, making a “malvinka”. Ready!An excellent option is suitable for a romantic date, going to the theater and even for a wedding.

Option 4
Grab a wide strand (from forehead to ear) at each temple. Secure the strands at the back of your head with an elastic band, masking it with a thin curl. Chaotically, in any order, braid a couple of thin braids. To make it even more fun, you can curl the ends of your hair a little.
Option 5
Separate a strand at each temple and make two flagella (turning the strands away from you). Connect the flagella at the back of the head, tying them with an elastic band. Braid the loose ends of the braid using your favorite technique. For example, ala “fish tail”.
Focus on accessories
With the help of ribbons and scarves, you can turn even the most ordinary ponytail into a work of art. Someone will think that hair with a scarf resembles a collective farm style. And he will be wrong! It's fashionable and beautiful - even Hollywood stars flaunt branded scarves skillfully tied to their hair. In summer, a scarf will protect you from the scorching rays of the sun. It also has other advantages: with the help of a well-placed scarf you can hide hair imperfections, overgrown roots, gray hair or a sparse parting.Option 1
Unwind and comb your hair. Tie a knot about halfway through the scarf. It can be a regular or decorative knot - to your taste. Place the scarf over your forehead (with the knot slightly to the side). Tie a double knot at the back of your head and hide the ends of the scarf behind the base of the fabric.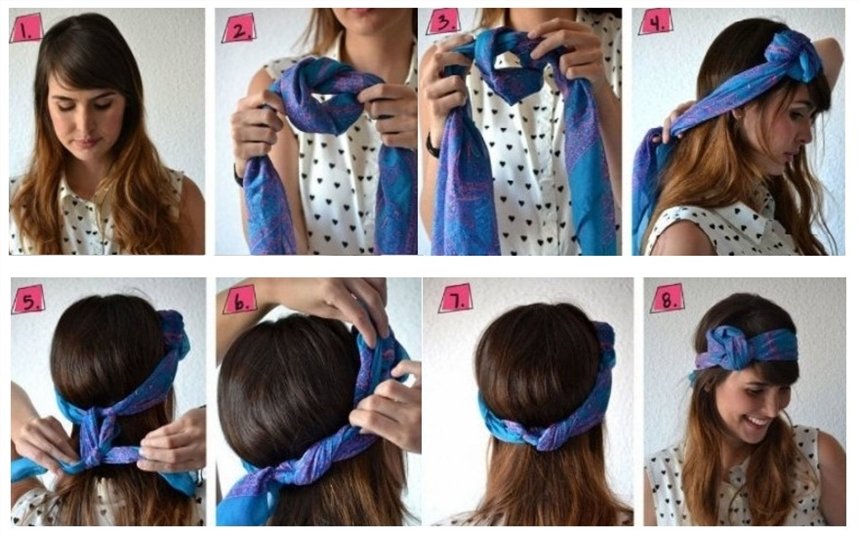
Option 2
Do you love fashionable pin-up looks? Then you will like this option.Divide your hair into two parts: the back (crown and back of the head) and the front (forehead). Gather your hair in a bun at the back. You can pre-braid it into a braid, which will give your hairstyle a fixation. Twist the hair in the front into a braid, style it into a donut and secure with bobby pins. The finishing touch: tie a cute scarf or scarf around your head.

Option 3
Another great version of the “pin-up girls” image. Create long bangs by parting a section above the center of your forehead. Gather the rest of your hair into one or more ponytails (the ends of which are curled with a curling iron). The most important stage is the formation of bangs. It is the large bangs that are one of the distinctive features of this style. We wind the front strand onto a curling iron. Give it the desired shape and spray it with varnish. We tie a small polka dot scarf behind the bangs with a bow.
Option 4
The popularity of the film The Great Gatsby renewed interest in American culture of the 1920s. And, of course, this interest has not bypassed the fashion world. Ladies of that era, going to a party, preferred short hair, and long curls were tucked under a catchy headband. However, the headband was also worn on short hair. In addition, hair was often curled. If you like to visit Mafia clubs or jazz bars, then retro styling will come in handy. Let's look at one way to create this hairstyle.Comb your hair to the side and wear a glamorous headband. We pass the hair through the headband - strand by strand. Voila! We advise those with short hair to smooth their curls with gel and (where would we be without it?) wear a headband!

Among these hairstyles, you are guaranteed to choose several for yourself.
Is it worth spending time and money in beauty salons before a special event if you are able to create an individual look with your own hands, guided by your limitless imagination and styling tips?
We would like to bring to your attention elegant, stylish and at the same time simple hairstyles for medium-length hair to create your image at home.
Having mastered a few simple lessons, you will always be able to make the right impression at any holiday, official event and in everyday life.
In order for any hairstyle to stay on your hair perfectly, you should not forget about proper care.
Before choosing the right shampoo and hair conditioner, carefully read its label. If there are too many unclear symbols and formulas written in small print on the back, return this product to the shelf. Not only will it not help your hair, but it can also cause harm.
Styling tools and products
In order to do your hair at home without the help of professionals, you will need a few basic accessories, tools and styling products. Their choice depends on your preferences and goals when creating an image. Fixation is done using well-known means:
- Varnish. Select it according to the degree of fixation that suits you. Spray from a distance of at least 15 cm to avoid a “sticking” effect.
- Foam and mousse. Mousse is suitable for fine hair, and foam for thick hair. Used for additional volume.
- Gel. Designed for modeling curls and waves. It is applied before drying, after which the styling is given the desired shape.
- Wax. With its help, you can fix individual strands without weighing them down. Suitable for very thick, very curly and unruly hair.
- Paste. It makes it possible to abruptly change the direction of the strands and perform any other manipulations due to the high fixation factor. Used for hairstyles that require long-lasting durability.
You will also need several accessories:
- curling iron;
- rectifier;
- hairpins;
- elastic bands;
- invisible.
All of these funds cannot be used at the same time. Some of them are used to create each hairstyle. Which ones exactly depends on the choice of hairstyle.
15 quick and beautiful hairstyles
Doing your own hair is not that difficult. By mastering basic styling techniques, you can always look new without additional costs.
A few simple but elegant hairstyles that will not leave you indifferent:
Divide your hair into 3 sections, tying the middle section into a ponytail. We braid 3 braids and secure the ends with small elastic bands. We wrap each braid into a bun and pin it with hairpins. This results in a row of three bundles.

Shell. Curl the strands with a curling iron approximately from the ends to the middle of the length. We make a small backcomb on the top of the head and tie the tail low. You need to wrap it up, passing the tip under the elastic band. We wrap a loop of hair with this tip and pin it at the back of the head with hairpins.

Tie your ponytail higher. Divide it into several identical strands, twisting each of them into a tight strand. Roll the bundles so that you get one volumetric bundle. We secure each strand with hairpins.

We divide the hair into 2 parts with a middle parting. We make bundles from the strands outermost from the face, twisting them towards the back of the head. We collect the tail lower along with the strands. You need to make a small indentation above the elastic to turn it inside. We continue to wrap the entire length in the same direction, hiding the remaining strands in the resulting niche. Secure with studs.

Divide your hair into 2 parts so that one is higher than the other and directed to the right, and the other to the left. We tie the right part with an elastic band, and weave a braid from the left. We wrap the tail with the resulting braid, securing the tip with a bobby pin at the back of the head. You can decorate your hair with an elegant hairpin.

You need to comb, separating the outer strands for braiding. We make two regular braids on the sides. We bring the finished braids together in the direction of each other, and quietly fix their ends with bobby pins. The result is a headband made from a double braid at the back of the head.

It is necessary to divide the hair into 4 equal parts, apply mousse or foam and secure them with elastic bands. We divide each section into several strands and alternately wind them onto a curling iron so that each is wound from the edge of the handle. Spray the resulting curls with varnish, then tilt your head and randomly straighten them with your fingers.

We throw the combed hair to one side. We leave a smaller part on the other side, which we divide into 2 more. We twist them into a double strand, gradually weaving additional strands from the larger part that was initially separated. We continue this way until we reach the opposite edge of the head. Then we fix it with an elastic band near the ear.

Separate the strand above the ear and braid it. Then wrap it around your head and secure it with a bobby pin near the opposite ear. At the end, create a small backcomb on the top of your head to add expressiveness to your headband.

We collect hair with an elastic band. We make a hole above it to put the tail through. We perform fishtail braiding or regular braiding, securing the tip with a small elastic band. Then we lift the braid, hiding the end at the base. We pin it with pins.

It is advisable to do this hairstyle at night after washing your hair. We divide wet hair into small strands (the thinner the strand, the more magnificent the curls will be) and twist them into strands, securing them with bobby pins. In the morning we straighten our hair with our fingers. In this case, you can use gel.

Divide the hair into upper and lower parts. We collect the upper lobe into a bun with a beautiful hairpin or elastic band, and the lower lobe in the same way, but with a small elastic band. We lower the top and get a voluminous tail.

Bow. We tie the tail higher, in the area of the crown. We pass the tip through the elastic in the direction of the face. We divide the resulting bundle into 2 equal parts, and the tip will be a partition, which we attach to the back of the bow.

You will need a hair straightener. Select several strands and twist the bundles. Along the entire length of the bundle, starting from the roots, we stretch the strand with a straightener. You will get a light wave.

The thinner the hair, the faster the curls and combs lose their shape, so you won’t be able to do without fixing products. Using the proposed schemes, improvise, experiment, create a new, unique image every day!
A few more options for beautiful hairstyles:


Simple hairstyles for every day for medium hair from our article will help you out whenever you have a catastrophic lack of time and an urgent desire to look beautiful. We promise that all the proposed options will take you no more than 5 minutes, and the result of your efforts will please you with a stylish and practical hairstyle. Well, let's get started?!
How to diversify your usual ponytail
Usually the first thing that comes to mind when you associate a “quick hairstyle” is a regular ponytail. But admit it honestly, you’re already so bored with him! Fortunately, we have several beauty tricks in our collection of secrets that turn the usual ponytail into a more interesting and original hairstyle.
Idea No. 1
This hairstyle, of course, does not pretend to be genius and innovation. But we consider it our duty to remind or tell you about it. Remember this method every time your hand reaches out to pick up an ordinary tail.
- First, braid your ponytail at the top, middle of your head, or at the back of your head.
- Then select one small strand from it.
- Now there are 3 options: form a rope from the strand, braid a thin braid, or leave everything as is.
- After this, twist the strand around the elastic band and secure the tip with a bobby pin.

Idea No. 2
This option is a little more complicated, but the result is definitely worth the effort.

- Weaving starts from one side. Select 2 fairly wide strands at the top of the temple.
- The one closest to the edge should be placed on top of the second strand.
- At the side braiding level, select another strand and place it on top of the one left in the previous step.
- Continue this manipulation until you reach the desired tail height.
- The same steps must be repeated on the other side.
- Then you should collect the entire mass of hair in a ponytail.
- To make the hairstyle even more beautiful, select a thin strand from the ponytail and twist the base with it to disguise the elastic band.
Idea No. 3
- The first stage is to divide the entire mass of hair into 2 parts using a vertical parting. In this case, the left half should be much smaller than the right.
- Turn the right part into a regular ponytail at the level of the back of the head.
- From the left strand you need to form a tourniquet and twist the elastic band with it.
- If the length of the hair allows, you can perform several twists.

Cute hairstyle for every day
Note! You will achieve the desired effect only if the plait and weave are sufficiently loose.
- The final touch is to secure the tip of the tourniquet with a bobby pin under the base of the tail.
Idea No. 4
Trends 2018-2019 do not require fashionistas to be able to build complex structures on their heads. Simple and easy hairstyles are the motto of this season. For example, this idea is 100% in line with fashion trends, because it consists of a simple braid and ponytail. How simple and how beautiful!
- From one temple, select 3 wide strands and start braiding them in your favorite way.
- When the braid is ready, you should straighten individual strands from it to create a spectacular volume.
- Form a ponytail in the center of your head, capturing all the hair along with the braid.
- The final touch is to disguise the elastic band of the tail with a thin strand.
Half down hair is beautiful
Fashionable hairstyles this season suggest leaving the main part of the hair loose and at the same time taking away the temple strands. We invite you to follow these trends and learn how to make feminine and practical hairstyles step by step.
Idea No. 1
This option looks great on medium to long thick hair.
- Use a horizontal parting to highlight the top part of your hair and form a small ponytail below the crown.
- Divide the ponytail strand into 2 halves and twist them into tight strands. Don't forget to secure the ends with rubber bands for security.
- After this, you need to twist 2 strands and also tie with an elastic band.
- Twist the resulting tourniquet around the beginning of the tail and secure at the end with a bobby pin.

Romantic hairstyle for any occasion
This hairstyle can be a real lifesaver when getting ready for school or work, because it has no strict age restrictions.

Idea No. 2
In less than 5 minutes you can repeat this elegant hairstyle. All you need is a few bobby pins and a little patience.
- First of all, comb your hair so that you can easily separate out individual strands later.
- From the side of the right temple, select a small strand and direct it in the left direction.
- A little further from the middle of the head, this strand should be secured vertically with a bobby pin.
- From the left temple you need to borrow a strand of the same size and point it to the right.
- This strand also needs to be secured with a bobby pin in the vertical direction.
- So you need to select the strands on each side one by one and secure them with a bobby pin on top of the previous one.

Options for buns
Various buns will be the simplest hairstyles for every day at work. They look discreet and elegant, which means they are guaranteed to fit even into a strict dress code.
Idea No. 1
- To make your hairstyle look neat and done quickly, you need to comb your hair well first.
- Then a thin strand is separated from each temple.
- These strands are woven into one ponytail above the back of the head.
- Another ponytail should be tied a little higher from the ends of the hair.
- Curl the large tail towards the first one with an inward twist.
- In this case, the tip needs to be disguised in the inner part of the bun, and the resulting beauty must be secured with bobby pins on each side.
Idea No. 2
Shoulder-length or shorter hair can be easily pulled into an elegant bun using a voluminous roller. The technology is elementary, and the result is amazing!
- Gather a high ponytail at the top of your head and thread it into a donut.
- Wrap the strands around the donut one at a time, not forgetting to hide the ends.
- We recommend decorating the base of the tail with a beautiful elastic band or scarf.

Idea No. 3
If you have perfectly mastered creating a bun using a donut, then you should definitely try this beautiful hairstyle.
- First you need to select 3 strands from one temple and start weaving a braid. For girls with bangs, we can advise connecting them to a braid or leaving them.
- Gradually braid the strands from the extreme side to the braid one at a time.
- Leaving the braid aside, you need to braid the ponytail at the back of your head, thread it into a donut, lightly comb it and form a bun.
- Finally, twist the braid around the base of the bun and secure it with a bobby pin.
Idea No. 4
Buns from a plait are the most practical hairstyle for girls, girls and women. But if you get bored with her, this secret trick can come to the rescue.
- First, separate 2 strands from the sides of your temples.
- Braid the rest of your hair into a tight ponytail at the back of your head.
- The tail needs to be formed into a bundle, and then into a bun in a circle.
- Secure the end of the bun securely with a bobby pin.
- Now comes the turn of the temporal strands.
- First, take one of them and wrap it around the bun.
- Do the same with the second strand.


The knot will be tied
Various weaves and knots provide a huge scope for experimenting with daily hairstyles for medium hair. Catch some of our ideas!
Idea No. 1
At first glance, this option seems complicated and incomprehensible, but you just have to practice doing the hairstyle using step-by-step photos, and you will change your mind.
- Step number one is to braid 2 high ponytails at the same level.
- Then divide one tail into 2 parts, turn each of them into a loose rope and twist these ropes around each other. Secure the end of the weave with a thin elastic band.
- The same must be done with the second tail.
- Direct the 2 ponytails towards each other, then point one of them towards the top and tie a knot of 2 working strands in the center.
- Do not skimp on bobby pins to secure this beauty so that the hairstyle lasts throughout the day.


A few more simple lessons on beautiful hairstyles are waiting for you in our photo selection for daily inspiration.


As you can see, it’s very easy to create simple everyday hairstyles for medium hair with your own hands. Don't regret a couple of minutes of your morning time to look your best for all your laziness!
A win-win set for all occasions is an elegant jacket or jumper with a V-neck and straight trousers. This top slims and lengthens the silhouette, and the bottom transforms the legs.
Everyone knows that to create a flawless image, you need not only to choose the right clothes, but also to do beautiful makeup, manicure and hairstyle. Of course, when it comes to some special occasion, there are fewer questions; you can just go to a beauty salon. But what to do with everyday looks? We think that many representatives of the fair sex often have the question: “Where can I find time for all this?”
Personally, we understand you perfectly! Therefore, today our fashion site is in a hurry to make your task easier. We have selected for you 12 everyday hairstyles for long hair that you can do very easily and quickly with your own hands.
The hairstyles, although simple, look very impressive and beautiful. Believe me, you can look stunning even with little time and financial investment!
Harness + bobby pins = Beautiful hairstyle in 1 minute
!
Simple bobby pins, pinned crosswise, not only hold you several times stronger, but also look very pretty! If you wish, you can slightly curl the ends of your hair and make a light backcomb at the back of your head.
Gracefully cross
Another hairstyle in 3 easy steps. If you have time, it is better to curl the ends of your hair, so the hairstyle will look even more impressive!!!


Side braid
Simple, elegant, touching. A feminine and romantic hairstyle that is perfect for a walk, meeting with friends, university or school.


It couldn't be simpler
We won't even comment too much. Everything is incredibly simple. True, light curls won’t hurt at all.

For fine hair
This option for a quick romantic hairstyle is suitable for those with thin hair. It turns out simple and elegant. But with thick hair, we’re afraid this trick won’t work.


Greek style
A gentle and feminine hairstyle in the Greek style can be done in 5 minutes without any additional accessories except a hair tie. The hairstyle looks simple, but very touching.
Braid hairstyle. Option 1
Did you know that good old 2 braids can be turned into a beautiful everyday hairstyle? Now you know for sure!


Braid hairstyle. Option 2
The second option will be a little more difficult if you are not particularly good at braiding hair using this technique. If there are no problems with this, then the hairstyle is done in 3 minutes.


Charming bun. 2 options
There are tons of options for making a beautiful, fashionable bun. But these 2 options are perhaps the simplest!
Option 1

Option 2


Everything is brilliantly simple!
It would seem like a small touch, but how elegant. Curl the ends a little and you are gorgeous. You can safely go to work or on a date.

Making a flower
This hairstyle is very simple and quick to do, but requires a little preparation: you need to make curls.

Medium length hair is wonderful. They have grown, are no longer in the way, and can be styled beautifully. We will show you simple hairstyles for medium hair for every day, which are quick and easy to do yourself. What kind of “medium length” hair is this? In the world of fashion Every expert has their own opinion. Some consider hair to be above the waist, others to the shoulder blades. Therefore, it is generally accepted that the average hair length is from shoulders to shoulder blades.
Babette
A mega-popular hairstyle invented in the 60s in France.
She was first shown by the incomparable Brigitte Bardot in the film “Babette Goes to War.”

Since then, the number of Babette's fans has been growing. This is a simple and elegant hairstyle for medium and long hair, decorating every girl and suitable for any occasion, just choose the jewelry harmoniously. And it's very easy to do. Yes, you will have to try hard the first time, but with practice it will become faster and easier. This is an example of a hairstyle that is easy to braid.
Babette is made for hair of any length, from the shoulders and longer. As additions, they use decorative pins, hairpins, bows, tiaras and everything that the imagination suggests.
Classic babette
Hairstyle for hair below the shoulders.
What do you need for this hairstyle?
Will be needed comb, comb for backcombing, elastic band, clip, bobby pins, pins, roller, varnish for fixation, gel or mousse for styling. A flat iron and heat protectant may come in handy.
Combing your hair correctly and safely is an art. Eat two ways to comb your hair: backcombing at the root and backcombing into the strand. Backcombing at the root is also called blunting or blunting. To do this, the strand is combed from the inside at the roots of the hair. Backcombing is done in strands to the very ends of the hair.

The comb for backcombing should be thin and with sparse rounded teeth. To avoid damage, it is recommended to comb your hair no more than once or twice a week.
How to make a babette hairstyle with your own hands - step-by-step guide with photos
So let's get started.
- Separate a section of hair horizontally from ear to ear across the crown and secure with a clip.
- Gather the remaining hair into a ponytail, comb it, and secure with an elastic band. This is the basis.
- Gently comb your ponytail all the way to the ends.
- Tuck the ends of the tail inward to make a roll, and pin it with bobby pins.
- Carefully comb the top hair from below and place it on a roller. You can tie the ends with a small elastic band to hold them in place. Wrap the elastic band and tails under the roller.
- Secure with pins.
- Smooth stray hairs with gel or mousse.
- If necessary, spray with varnish.
Advice: The height of the lower tail depends on the shape of the face.
- A round face will be visually longer if you twist a babette on the top of your head.
- Square and triangle shaped faces look softer with sparse bangs or a few curls around the face.
- An elongated and thin face can be highlighted by moving the base of the babette to the back of the head and placing side-swept bangs.
- Girls with large features should have a fuller hairstyle. And graceful young ladies with delicate features should not get carried away with backcombing in order to look harmonious.

Babette on loose hair with bangs
A wonderful option for a quick hairstyle for medium hair with bangs.
What do you need for this hairstyle?
You will need a comb, a comb with a fine tip, hairpins, a crab clip, bobby pins, and hairspray.
How to make a babette with bangs with your own hands
- Comb thoroughly.
- Separate a strand along the forehead above the bangs and pin it with a clip.
- A little lower on the crown, separate the wider part so that there is hair on the sides, and twist it into a tight plait.
- Roll the twisted rope into a bun on the top of the head and secure with hairpins.
- Comb the top strand again, comb it from the inside at the roots and place it on a bun, securing it with bobby pins.
- Take the strands from your temples and pin them with bobby pins under the roller.
- Gently comb your loose hair from the bottom to blend the strands.
- Style your bangs.
- If desired, let out a couple of strands near your face.
- Spray with varnish.

Bun (bun) on a “donut”
Ballerinas' favorite bun(or bun) can be made using the so-called “donut”.
You can buy a donut made of foam rubber in a specialized store, or you can make it yourself from a thick sock or terry rubber band.

This simple hairstyle for medium hair is perfect for both girls and adults. We will show two ways to create such a beam.
1 way
What do you need for this hairstyle?
For this easy hairstyle for medium-length hair, you will need a comb, an elastic band, a donut and hairspray.
How to make a bun with your own hands
- Comb yourself very well.
- Gather the tail where you plan to bun, secure with an elastic band.
- Thread the tail into the donut until halfway.
- Distribute any loose hair evenly over the donut and carefully begin to twist it around the donut, holding the ends.
- Carefully twist the bun around your hair until the bun is at the very base of your ponytail.
- Straighten any stray strands and fix with hairspray.

Method 2
What do you need for this hairstyle?
Prepare a comb, two thin elastic bands that match your hair color, hairpins and a donut. For an elegant option - flowers or a beautiful hairpin.
How to make a bun yourself - step-by-step guide with photos
- Make the tail using the first method.
- Thread the entire tail through the donut so that it fits around the elastic.
- Distribute the hair evenly over the donut so that it is not visible.
- Secure the resulting structure on top with a second elastic band so that there are free ends.
- Divide the ends of your hair into strands and braid them, maybe several.
- Wrap each braid around the base of the bun and secure with hairpins.
- If desired, decorate with ribbons and hairpins.

Two-piece voluminous ponytail
This hairstyle is for medium length hair lasts great throughout the day. It requires a minimum of effort and time.
What do you need for this hairstyle?
You will need two elastic bands (preferably the same color as your hair or transparent silicone ones), a comb, a comb with a thin tip, and a hair clip.
How to make a voluminous ponytail with your own hands
- Comb your hair well.
- Separate the top section of hair with the tip of the comb, approximately from the ears, through the crown.
- Comb this part of your hair a little from the inside with a comb so that the topmost hair remains smooth for beauty.
- Tie the ponytail slightly higher than the final hairstyle. Fix it loosely so that you can move the elastic band later without damaging your hair. Throw the long part of the tail forward and secure it in front with a clip so that it does not interfere.
- Comb your loose hair and gather it into a second ponytail under the first, secure with an elastic band.
- Remove the clip and carefully straighten the top ponytail to hide the elastic band of the bottom ponytail. If necessary, move the top elastic down slightly.
- Seal with varnish.

Advice: If you wrap your hair in large curlers in advance, the tail will be more voluminous.
Bushy tail
This hairstyle is easy to braid at home.
What do you need for this hairstyle?
For it you will need a comb-brush, a comb with wide teeth at the end and two elastic bands, one thin, the other of any color and thickness.
How to make a thick ponytail with your own hands - step-by-step guide with photos
- Comb all your hair well.
- Using a thin comb, gather the ponytail so that there is loose hair at the edges of the head (see picture).
- Tie the collected ponytail with a thin elastic band.
- Pick up the remaining strands and carefully comb them so as to gather, as it were, an outer ponytail around the already tied one.
- Secure with a second rubber band.
Advice: you can curl the ends into beautiful waves or structure them with hair wax.
Easily. Watch a video. This simple hairstyle for medium to long hair quickly turns into a wedding hairstyle with the addition of matching jewelry.
Volume tail
Master class on creating a voluminous ponytail using backcombing. A wonderful hairstyle for any occasion is quickly and easily prepared.
Gorgeous tail with crab and bobby pins
This video will show you how to create a luxurious ponytail using a small crab clip. This light hairstyle is perfect for a holiday with medium to long hair. All that remains is to put on bright earrings and apply festive makeup.
We hope that the article was useful to you, and that the proposed hairstyles will one day turn a gray morning into the beginning of a festive day. Tell us in the comments which hairstyles you liked the most.